As the manufacturer, we emphasize that correct installation is critical to the performance and service life of rubber flexible expansion joints (also called rubber soft joints, vibration absorbers, flexible connectors). Improper installation can cause leakage, joint damage, premature failure, and even compromise the safety of the entire pipeline system.
1) Pre-Installation Preparation
Verify model and specification. Confirm the joint model, nominal diameter, overall length, working pressure rating, and connection type (flange standard, bolt quantity, and hole size) fully match the pipeline design.
Visual inspection. Carefully check the rubber body, inner/outer covers, and reinforcement (cord fabric or wire rings) for cuts, cracks, delamination, blisters, scratches, or deformation. Ensure flange sealing faces are flat, burr-free, and free of corrosion.

Check mating flanges and fasteners.
- Mating flanges must match the joint’s flange specification, standard, pressure class, and sealing-face type.
- Mating flange sealing faces must be clean, flat, and undamaged.
- Use bolts, nuts, and washers (flat and spring) that meet the specified material, grade, and diameter.
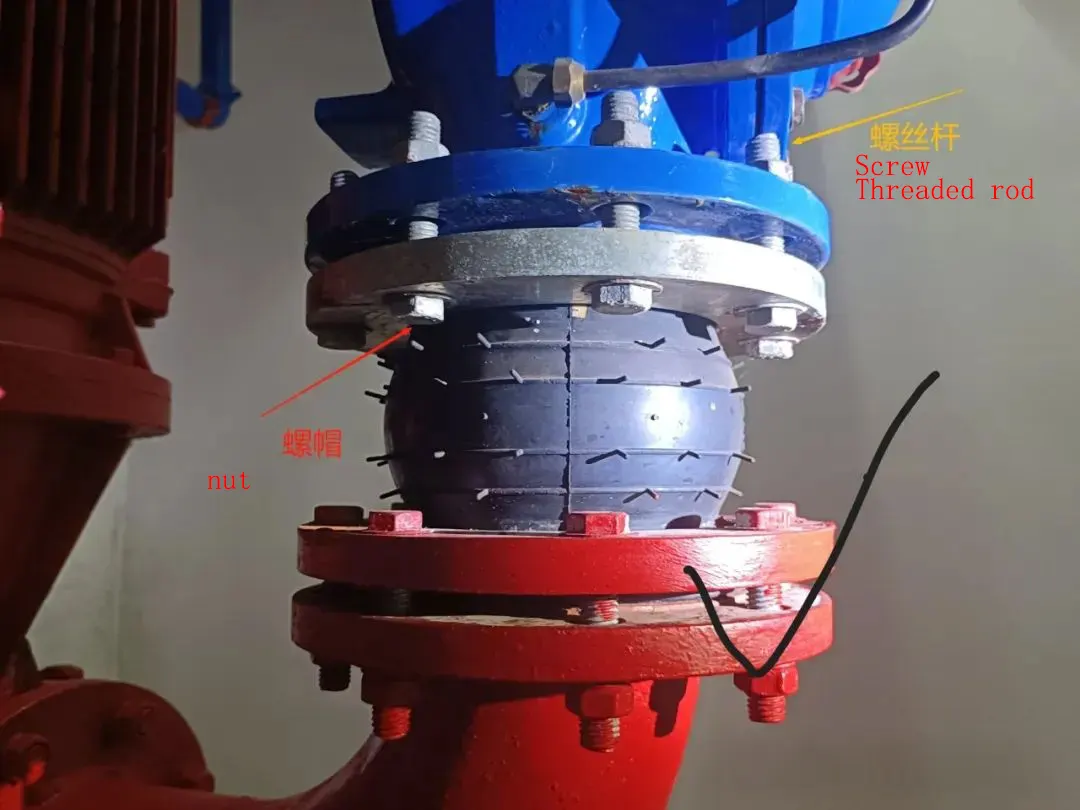
- Bolt length is critical: bolts must pass smoothly through both pipe flanges and the joint flange and fully engage the nut. The bolt end should protrude 1–2 threads beyond the nut.
- Do not use over-long bolts. When tightened, they can bottom out against the rubber sphere, bruising or even piercing the rubber.
Cleanliness. Remove dust, oil, weld spatter, and metal chips from the joint flanges, mating flanges, and bolt holes.
Remove shipping protectors. If limit screws/rods or end covers were installed for transport, remove them completely before installation. These are only for transit protection; keeping them will restrict movement compensation and can damage the joint or pipeline.
2) Selecting the Installation Location
- Near vibration or displacement sources. Typically install close to pump, compressor, or fan nozzles, or where thermal expansion/contraction or settlement must be absorbed.
- Avoid stress concentration. Avoid installing directly at elbows (e.g., near 90° bends) or reducers unless specifically designed. If proximity is unavoidable, leave sufficient free space for joint movement.
- Vertical risers. On vertical lines, if the medium is heavy or the joint is low in the run, add suitable supports (e.g., spring hangers) beneath the joint to carry pipe/medium weight and prevent excess axial tension.
- Horizontal runs. When multiple joints are used, keep adequate spacing to avoid interference. Ensure proper pipe supports so the joint does not experience excessive shear or torsion.
3) Key Steps During Installation
Alignment
This is the most critical step. Before installation, ensure the two mating flanges are parallel and concentric. Non-parallel or off-center flanges twist the rubber element, creating extra stress that leads to seal failure, local tearing, or flange damage.
- Use a straightedge, feeler gauges, or dedicated tools to check parallelism and concentricity.
- Adjust pipework or equipment until the flanges are fully aligned.
Initial Positioning
Place the joint gently between the mating flanges. Hand-insert all bolts and run the nuts finger-tight only, allowing the joint to self-center. Do not pull the joint to force bolt-hole alignment.
Bolt Tightening
- Use appropriate tools, ideally a calibrated torque wrench.
- Tighten in a cross/“star” pattern in multiple passes (at least three), evenly and progressively. Never tighten one side fully or go around in a circle.
- Torque values should follow the product manual or applicable standards (e.g., HG/T 2289). Do not over-tighten. Excess preload can drive the flange into the rubber sphere, over-deforming the rubber and damaging the internal cords, which reduces pressure capability and service life, and may crack the rubber. Proper torque achieves uniform face contact and an effective seal.
- Confirm all bolts share the load evenly.
Control Length and Movement
- Install the joint at its natural (free) length—no stretch, compression, offset, or angular deflection—unless drawings specify a preset.
- Never force the joint to make up pipe gaps by stretching, compressing, twisting, or offsetting. The flange-to-flange distance must match the joint’s natural length. Adjust the pipework if needed.
- In service, actual movements (axial, lateral, angular) must remain within catalog-rated values. Avoid reaching multiple maxima simultaneously and keep a safety margin below ratings.
Prevent Welding Damage
- Do not weld near an installed rubber joint or on its flanges. Hot spatter and heat will burn the rubber and cause immediate failure.
- Complete all welding on the pipeline first and let it cool, then install the joint.
- Thoroughly clean all spatter and burrs afterward.
4) Notes for Special Service Conditions
- High-temperature media: Select heat-resistant rubber (e.g., EPDM). At elevated temperatures, rubber modulus and strength decrease—allowable movement may reduce.
- High-pressure media: Select a pressure class that meets design pressure; ensure flange and bolt grades are adequate. Tightening uniformity is even more important.
- Corrosive media: Select rubber suitable for the medium (e.g., FPM/Viton for oils/acids/alkalis; NBR for oils) and appropriate flange materials (e.g., stainless steel).
- Vacuum service: Use rubber joints with vacuum (negative-pressure) rings and install strictly per instructions.
- Large diameter / above-ground lines: Provide sufficient supports (especially spring or adjustable supports) to carry pipe weight. Place supports close to the joint without restricting movement.
- Buried installation: Use joints designed for underground service (typically with pull-out restraints and anti-corrosion layers) and backfill/protect per relevant codes.
5) Post-Installation Checks & Maintenance
Visual check. After installation, verify the joint has no abnormal deformation, flanges are parallel, and bolts are tightened evenly.
Pressure test.
- Raise pressure gradually and slowly—avoid pressure shocks.
- At test pressure, inspect the joint and flange connections for leaks, bulging, or abnormal deformation. If any issue is found, depressurize immediately and rectify.
Routine inspections during operation:
- Check for bolt loosening (if needed, re-tighten to specified torque using the cross pattern).
- Look for abnormal deformation, cracks, bulges, hardening or softening—signs of aging.
- Check for leakage.
- Verify supports function properly.
Replacement. Replace the joint promptly if severe aging, cracking, permanent deformation, exposed reinforcement, or persistent leakage is observed.
Key Takeaways
- Alignment is the lifeline: flanges must be parallel and concentric.
- Tighten correctly: cross-pattern, progressive, even torque—no over-tightening.
- Respect movement limits: install at natural length; do not force stretch/compression/twist; keep working movements within ratings.
- Keep away from heat/welding: complete welding before installation; protect rubber from heat.
- Support properly: use engineered supports to avoid extra loads (weight, bending).
- Right selection first: pressure, temperature, medium, and movement must match.
- Inspect regularly: monitor in service and replace at end-of-life.
Strictly following these installation requirements and our manufacturer’s manual is key to safe, reliable, and long-lasting performance of rubber flexible expansion joints. If you have questions, consult a professional engineer or our technical support.
Note: Different manufacturers and constructions (single-sphere, double-sphere, reducers, joints with limit rods, etc.) may have specific requirements. Always refer to the product-specific installation manual.
FAQs
Q1: Can I use the joint to make up for pipe misalignment?
A: No. Install at natural length and align the piping. The joint is for controlled movement within rated limits, not for permanent mis-gaps.
Q2: How should I tighten the bolts?
A: Use a calibrated torque wrench and a cross/“star” sequence in multiple passes. Follow the torque guidance in the product manual or HG/T 2289. Avoid over-tightening.
Q3: What rubber should I choose for hot or corrosive media?
A: Use EPDM for heat/steam; NBR for oils; FPM/Viton for oils/acids/alkalis. Match flange materials accordingly. Always confirm compatibility with your medium and temperature.
Q4: What about vacuum lines?
A: Specify joints with vacuum rings and install per instructions to prevent collapse.
Q5: Can I weld after the joint is installed?
A: No. Welding heat and spatter will damage the rubber. Finish welding and cooling before installing the joint.